JAVA

Friday 17 April 2020

Domains Using Database


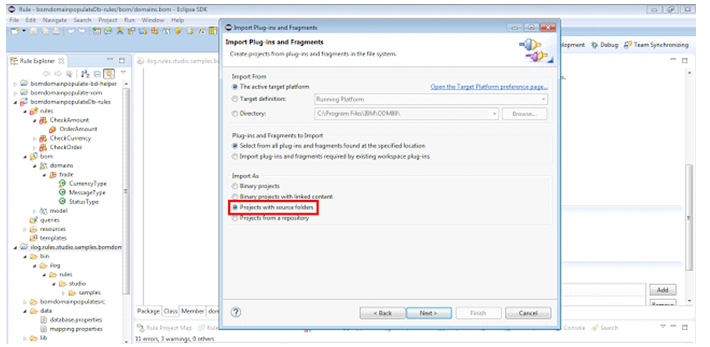
Go to window and select Samples Console from open perspective. Then click on import projects in Data sources for BOM Domains to import the project as shown in the below fig.


 Now the bomdomainpopulate project is imported into our Rule Designer. This project uses a plugin project with the name ilog.rules.studio.samples.bomdomainpopulate to fetch the domain values from DB. This plugin project works with Derby DB. To work with Derby DB, we can refer the following link here(using default derby data base use above link.

 If we want to use a database other than derby, then we need to do some changes in the plugin project, so that it can work with the preferred DB. To do the changes in the plugin project, we need to follow these steps

Go to File and select import. Select Plugins and Fragments from the import window as shown and click on next


Select Project with source folders and click on next.

Select ilog.rules.studio.samples.bomdomainpopulate and click on add.

click to finsh.

         
              We have imported is an existing plugin project. Now we will do the following changes in this project, to make it work with other DB. Click on the plugin project and select properties. Click on Java Build Path and remove derbyclient.jar and click on OK

Now remove the derbyclient.jar from lib folder.


Now add the required DB driver jar file in the lib folder as shown. For example let us make this plugin to fetch domains from Oracle DB. So add ojdbc6.jar file in the lib folder

Then Select the plugin project and click on properties. Click on java Build Path and add the ojdbc6.jar file, which is present in the lib folder of the plugin project

Then click on data and select database.properties. This properties file has the properties w.r.t., derby DB.

Change the properties w.r.t. the preferred DB. For eg., the following figure shows the connection properties with reference to the Oracle DB.

After that, select the MANIFEST.MF file and click on run time tab as shown. Remove the Derby references

                                                                                                                                                               After removing the derby references, add the DB references which we wanted to use. Here we take it as oracle references.


Now click on build tab as shown in the fig and select the lib folder in which the ojdbc6.jar is present.


Now click on MANIFEST.MF tab and remove the “lib/derbyclient.jar” and add “lib/ojdbc6.jar”.

 Now go the default plugin folder in your PC. The default plugin folder will be in the path: 

<INSTALL_DIR>/IBM/IMShared/plugins. Here the number 8.8.0.0 in the folder name refers to the ODM version we are using. Take the backup of the folder shown below. This is the same plugin project which we have worked in eclipse. But the changes done by us are done at the work space level. To reflect the changes in the plugin level, copy the plugin project from eclipse IDE and paste in this default plugin location


Now go the preferred DB console and enter the following commands. Click Here.
    

Now the changes are completed. Restart the eclipse IDE, so that the changes made in the plugin will be reflected in the eclipse IDE. After restarting the eclipse IDE, select the bomdomainpopulate-rules project and click on Currency Type. If there are any domain values in the domains section, select “Edit the domain” option.

Select all the domains and click on remove. Click Finish.

Then select all the members and click on delete.

Click on save and then click on synchronize with dynamic values.

Now we will be able to see the domain values which are fetched from the preferred DB i.e., Oracle.

If we add or delete any domain values in the DB, click on synchronize with dynamic values to reflect the changes.

Creating Dynamic Domains at Decision Center using Database:

Go to Samples and Tutorials window in Rule designer. Select Data sources for BOM domains in decision center tab and click on import projects.


 The serverbompopulate project will be imported to the Rule designer. The src folder of serverbompopulate contains two classes DomainValueProvider and DomainHelper. When we click the DomainHelper class, we will see this following code.

  
                    We can see the values are hard coded and it is not dealing with Database. So we are going to change the code so that it can work with DB. Delete the DomainHelper.java and download the two java files given in the link Click Here. Place the java files in serverbompopulate package of src folder. Add the required database driver jar into the lib folder. If Oracle DB is used, then add ojdbc6.jar into the lib folder. If derby DB is used, add derbyclient.jar into the lib folder. Here Oracle DB is taken as reference in this context.

               Then click on the serverbompopulate project and click properties. Select Java Build Path and click on add jars. Add the jar which is recently added to the lib folder of serverbompopulate.


Now we need to do some modifications in the bulid.xml file to make this project work in context with the changes. So The below fig., depicts the changes that are needed to be done in build.xml.


      Give the name of your jar file in the boxes shown in the above image. As we have used Oracle DB, it is ojbc6.jar. Now the changes are done. Now go to window and then show view. Click on ant. Double-click on the repack command in the build.xml file.

        This command does a series of tasks. It copies the jrules-team server.ear file into a temporary location. In that temporary location, it unpacks the ear file and then unpacks the teamserver ear file. After that, it converts the src folder of serverbompopulate to a jar file and also copies the ojdbc6.jar file to lib folder of the war file. Then it packs the war file again and then it packs the ear file. The final ear file will be seen in the websources folder of the serverbompopulate project in Rule Designer.

     After you see the BUILD SUCCESSFUL message in the console, click on deploy command in build.xml. This copies the ear file and it deploys it in the samples server.

     After successful deployment, click on set-config-param command to assign the custom property with key derbyDataBaseDomainProvider. The sample logs generated when executing the repack, deploy and set-config-param can be seen here.

Now go to decision center and select bomdomainpopulate-rules project. Depending on the ODM version, it will be in Work on a rule project or in Work on a decision service.


Go to Project tab and click on Update dynamic domains


Click on the required type that is needed to be updated and click on update.

On successful updation, a message will be displayed as shown

Now we will be able to see the new domain value. If we removed a domain value from the database, then that value will be shown as deprecated and it cannot be visible in the drop down box as shown.


Thursday 16 April 2020

Rule Model Extension

Rule Model Extension:


Introduction


        The purpose of the document is to give an overview about Rule Model Extension and to provide clear idea about “how the Rule model extension helps to add custom properties of different data types” to the rule and also various steps involved while creating such extension model files and extension data files. Also help us to import the created extension model and extension data files into the file System and visualizes the various actions involved while integrating such developed custom properties with the Rule Studio.

How to add custom properties  to rules?


•    Rule model extension defines the artifacts that are managed in a rule project. These artifacts have associated properties with various types also helps to extend the rule model to provide new properties.

•    Rule model extension helps to create a new type of rule artifact or rule package, or to add properties to existing rule model classes.

Rule model extensions are common to Rule Studio and Rule Team Server environment.


We can define extension once for both the environments. You then need to integrate the rule model extension into Rule Studio or Rule Team Server, and then synchronize the extensions of the two environments.

.
Rule model extension extends to extension model and extension data.

Rule model extension can be defined in both the rule model extension editor and standard xml editor environment.

Extension Schema


     You can define rule model extension in XML file. The default extension file is the extension model file, which defines the structure of the extension model. You can associate extension data file to the extension model file, which defines the values for the properties.
a)    Extension model.xsd
b)    Extension data.xsd

Default Extension model


  The following table shows the default properties associated with the rules.

Rule Extension Model

Rule Model Extension Editor


i.    It helps to change the data in the extension model in the root level or model level.
ii.    To open rule model extension editor, double click on the extension model file (.brmx) and (.brdx) extension data file in the rule explorer.

Actions in the Rule Model Extension Editor
Steps to create Rule Extension Model

1.    Select File-> New-> Other-> Rule Designer-> Rule Model Extension-> Extension Model.

select next.

3.    Select any one rule project as a parent folder.
4.    Ensure that “Fill with default extension content” is selected.
5.    Click Finish.
 Now the Extension Model Editor looks like
Highlighted fields are the default properties

List of custom properties to be added

Let us add four more properties to the action rule

1. RuleId
2. RuleVersion
3. RuleCategory
4. RuleDescription
Steps to add custom properties to the extension model file

Step 1: Right click on Rule: Add Property and select new child -> property


Step 2: In the following screen shot shows the newly added property RuleId of data type Integer

Highlighted value is the new property file (RuleId) which is added recently.
We can also choose the data type of the property from the “drop assistance box”.


Added one more property of type Float. Similarly we can also add more number of properties

RULE EXTENSION DATA


Rule model extension editor to help you create or modify an extension data file.

Extension data file (.brdx) which is associated with the extension model file (.brmx) helps to add values to the properties which is added recently.

Actions in the Rule Extension Data Editor

Steps to create Rule Extension Data

1.    File-> New-> Other-> Rule Designer (or) Rule studio ->Rule Model Extension-> Extension
2.    Actions in the extension data editor:
3.    Click Next.


 4.    Similar to the extension model file we can expand the tree and by making right click on root level node can add same kind of properties as we created in the extension model file.


5.    Adding values to the properties using extension data.

Steps to add values to the properties:

1.    Adding values to the properties which is added through extension model file (.brmx).
2.    Select the property child element, consider the above screen shot as example RuleVersion
3.    Set the default value as you like or set depends on the requirements.
4.    Save it once.

Integrating Rule Model Extension with the Rule Studio


After integrating the rule model extension with the Rule Studio, the changes which we made will reflect in the property tab once we restart the Rule Studio.

 Above screen shot shows the newly added properties and their default values associated with the simple rules.

How to add a custom property of type “Enum”?


Steps to add an Enum properties


Step: 1 EXTENSION MODEL FILE
1.    Open the Rule Extension Model Editor.
2.    Rule: Add Property -> New Sibling -> Enum.
3.    Following screen shots will helps to add a property of type Enum.

 
4.    Select

5.    Adding Values to the (RuleCategory) property of type “Enum” using extension data file.
6.    Create a new property in the extension data file as follows.
Right Click on <extension data >tree -> New Child -> Enum data.

7.    Enter the property name as “RuleCategory” as given in the extension model file.

8.    Select the button which is highlighted in circle.
9.    It will open a window where we can add our values. Following screen shot will gives a clear idea to add Enum values


10.    Finally we added a custom property “ruleCategory” of type “RuleCategory” which is nothing but an “Enum”.
11.    Following screen shot will clearly explains the “rule category” of type “RuleCategory”.

.


12.    Similarly we can add RuleDescription as another property which is of type “Enum”.
13.    The ruleCategory property of type “Enum” will look as follows


Steps to integrate the props with the Rule Studio

Below mentioned are some screen shots to integrate this rule model extension with rule studio.
1.    Select Window-> Preferences -> Rule Designer -> Rule Model Extension.


2.    Click the Change from workspace button.
3.    Select the particular Rule project and expand the tree.
4.    Import both the extension model and extension data files into it.
5.    Click Apply and ok.
6.    Restart your Rule Studio.
7.    Open any one simple rule and check for properties in the property tab.
8.    Finally the custom properties associated with the rules are displayed as follows
9.    Repeat the above steps whenever you add additional properties.


•    This Rule model extension helps to add additional features to the Business Rules and hence we can also display their version status and version of rules.
•    It helps to insert your own code, at specific extension points: for example, to hide a specific property, or to call some code after a property value is changed.
These are few benefits of using properties which is associated with the rules.